A router (or access point) plays a major role in our computer setup. However, we fail to pay close attention to it “as long as it works,” so we forget about it until we experience issues, drops, poor performance or, even worse, security breaches in our workplace or home’s virtual gateway .
One of these security tasks entails managing the Wi-Fi network’s username and password as soon as we set up a new device (either one that we bought or one provided by an operator) in our network. Although the situation has improved, there still are vendors that use less secure protocols and passwords that can be easily discovered. The passwords might even be found on a sticker on the router for third parties to see even if you do not want them to.
Moreover, it is recommended to change the above-mentioned data every once in a while as a regular maintenance task performed on our devices and networks. Also, as we were saying, it is important to verify if we are using the most secure encryption methods, as there are some (WEP) that can be hacked easily.
Finding the router’s IP address
We can access most routers through a web interface, but first we have to find out its “name”, which is determined by its IP address. We can find the IP address in any of the connected devices’ network details as “Router” or “Default gateway”. We are talking about a series of numbers like this: 192.168.x.1.
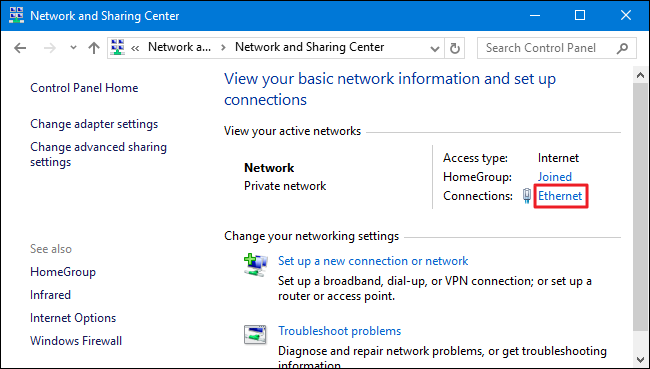
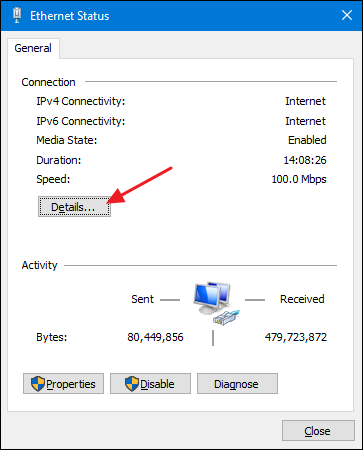
- Windows: To see a router’s IP in a Windows computer, go to Control Panel (or click the connection icon on the taskbar) > Network and Sharing Center > and click Local Area Connection ow Wi-Fi depending on which network you are using. We will see a window with the connection status.
Click “Details” and you will be able to see the connection’s entire information, including the element that we are most interested in: the default gateway’s IP address.
-
Mac: In OS X computers, we have to click the Apple Menu > System Preferences > and then click the Network icon. Select the Ethernet or Wi-Fi connection and go to “Advanced.” Click the TCP/IP tab and you will see the IP address next to “Router.”
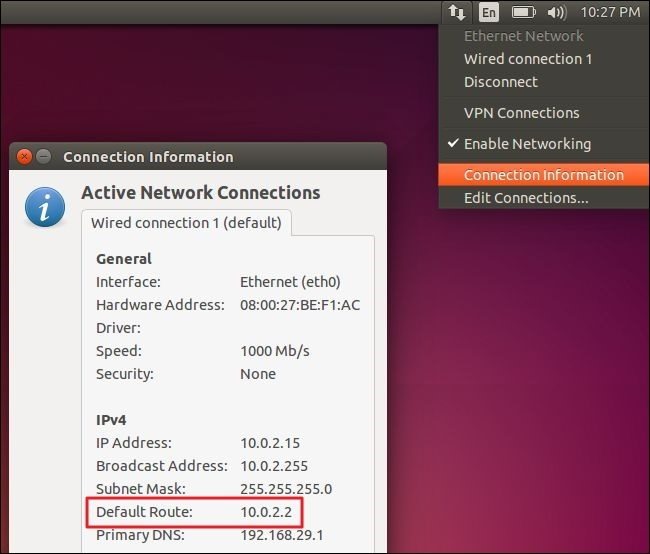
- Linux: In GNU/Linux distros, we can get the information the same way we do in Windows and Mac. We just have to go to the system’s configuration menu and then to networks, or we can just click the connection icon. For example, doing it in Ubuntu is as easy as clicking the connection icon (up and down arrows icon) to see the router’s IP address, which in this case is dubbed “Default route”.
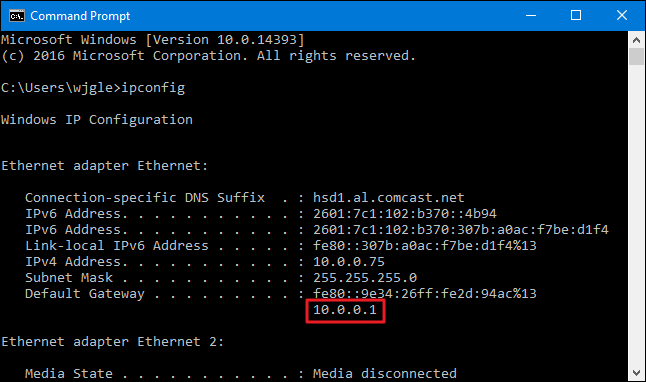
We can get this information in every system via command-line interfaces. This is really useful because they are universal commands that work for every OS version, respectively. For example, in Windows, we just have to go to Command Prompt and type the simple “ipconfig” command to get the information. The same goes for Linux, which needs the “iwconfig” command.
Accessing the router
Once we have the IP address, we can access the router’s settings using a web browser. In the example, you will see that our IP address is 192.168.1.1. Yours will be similar (192.168.2.1 or something alike). We type the IP address on the web browser and then hit “enter,” just like we would do with any URL.
This will show us a window on which we have to type the router’s username and password to gain access. You will have to use the default data in case you have not changed it yet. Most routers use the “admin/admin” user/password combination; some just need to leave the password field blank.
In order to see the router’s default username and password, you can Google the router’s name and model or check the user guide (either in its physical or digital form.) The webpage RouterPasswords provides a list of default usernames and passwords for a lot of different routers.
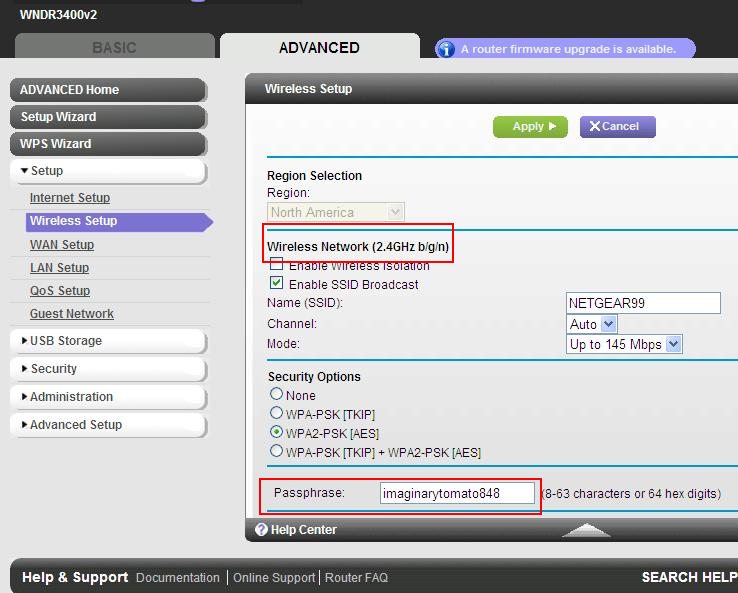
Once we have the router’s username and password, we can gain access to its web interface. There is no standard interface, as each manufacturer uses a different one. You will have to look for tabs like “Wi-Fi,” “Wireless,” “Wireless Networks” or “Wireless Connection,” for example.
There we can manage our Wi-Fi network’s settings easily for the following elements:
- Name (SSID): The name of our Wi-Fi network (a maximum of 32 alphanumeric characters)
- Security options: The protocol we will use (WPA2-PSK whenever we can)
- Password: Long and complex, mixing letters, numbers and special characters
There are more elements to check, like the channel options to avoid saturating the spectrum or the ability to make your network’s name (SSID) visible or not. Now that you are managing the router settings, we recommend you to check other elements beyond Wi-Fi settings. You can update the router’s firmware, change the router’s default sessions or disable remote access as a security measure.
